Preparing data for migration into Dynamics 365
Dustin Miner
- posted on
- Comments Off on Preparing data for migration into Dynamics 365
Scenario 1
The following scenario is an example of how to take contacts & addresses from a legacy system and to present the data in a form that’s ready to be imported into Dynamics 365.
Prepare data
Consider the following data which has been extracted from the legacy system.

This data needs to be separated and cleansed so that it can be imported into a custom address entity and the Dynamics 365 ‘Contact’ entity.
An ‘Address’ excel sheet (Figure 2) is created with each row having uniform formatting applied to each unique address. Microsoft Excel helped to ensure that each address is unique. This was achieved by highlighting the cells in ‘Street 1’ column, selecting ‘Conditional Formatting’, ‘Highlight Cell Rules’ and finally selecting ‘Duplicate Values’. This may not seem necessary in this simple example, but when there are 1000s of rows, it’s invaluable

A ‘Contact’ excel sheet is created next. A VLOOKUP is then used to link the addresses to the contacts.

The two excel sheets are now ready to be imported into Dynamics 365.
Scenario 2
The next scenario is an example of how to extract data from a legacy database and to present that data in a form that’s ready to be imported into Dynamics 365.
Prepare data
Consider the following legacy system’s database tables.

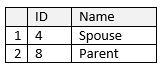
These two tables need to be mapped to a Dynamics 365 table (entity) which contains the following columns: First Name, Last Name, Relationship Role, Street 1, City, State & Postcode.
The following SQL retrieves the data from the two tables and maps it to the columns of a Dynamics 365 table (Figure 6)

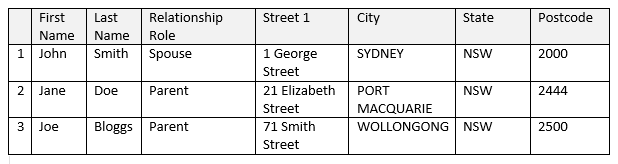
The result set is then exported into a spreadsheet which can then be imported into Dynamics 365