This post discusses five examples of a Dynamics 365 form (in a model-driven app) interacting with an HTML web resource embedded within that form
- Content Window
- Xrm.Navigation.NavigateTo
- Pass record object-type code and unique identifier as parameters
- Pass ‘record’ by Custom Parameter(data)
- window.parent.Xrm.Page
1.) Content Window
A control (addresscontrol.html) is uploaded to Dynamics 365 as an HTML web resource WebResource_primaryaddress.
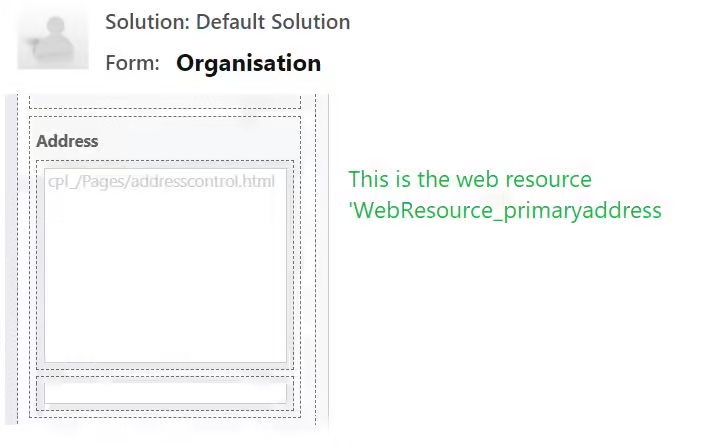
As shown in Figure 1 below, the green box represents this control as an embedded web resource on a form. This example will demonstrate how one parameter (i.e. the control’s label) can be passed into the control during the form’s onload event.

Figure 2 displays the form designer view, where ‘WebResource_primaryaddress’

Passing a parameter to the web resource
When the form is loaded, the following onload JavaScript function is called. The JavaScript gets the content window of WebResource_primaryaddress web resource and then passes one parameter to this web resource via its function initAddressControl(). (The content window enables communication between the parent form and the HTML web resource.)
var Contoso = window.Contoso || {};
Contoso.Address = Contoso.Address || {
    onload: function (executionContext) {
        var formContext = executionContext.getFormContext();
        var wrPrimaryAddressCtrl = formContext.getControl("WebResource_primaryaddress");

        if (wrPrimaryAddressCtrl) {
            wrPrimaryAddressCtrl.getContentWindow().then(function (contentWindow) {
                contentWindow.initAddressControl("Primary Address");
            });
        }
    }
};
Receiving a parameter in the web resource
The addresscontrol.html (i.e. WebResource_primaryaddress) is shown below. It contains the function initAddressControl() which sets the control’s label text to ‘Primary Address’.
(Note: although not included in the code snippet below, the control allows an address to be entered and then calls the Kleber cloud service to validate the address. Once validated, it stores the result in a hidden text attribute (i.e. cpl_primaryaddress) on the form.)
<html>
<head>
    ...
    <script>
        function initAddressControl(controlLabelText) {
            $("#ctlLabelText").text(controlLabelText);
            ...
        }
    </script>
</head>
</html>
Suggested Enchancement
For better flexibility, consider extending initAddressControl() to accept additional parameters: Xrm and formContext. Assigning them to global variables within addresscontrol.html would make them accessible throughout the control
2.) Xrm.Navigation.NavigateTo
An example of this is described in the post XRM.Navigation.navigateto a HTML web resource
3.) Pass record object-type code and unique identifier as parameters
Consider the ‘Pay Now’ button below (Figure 3). It’s defined as an HTML web resource (WebResource_paynowbutton) and has been added to a Dynamics 365 (invoice entity) form. The invoice entity GUID needs to be passed to this button.

First of all, clicking on the ‘Pay Now’ button in the form designer will display the dialog shown in Figure 4

Then, clicking on the web resource (cpl_/Pages/PayNowButton.html) will display the dialog shown in Figure 5

Still referring to Figure 5, clicking on ‘Pass record object-type code and unique identifier as parameters’ allows the entity’s GUID (in this case the invoice entity GUID) to be passed to the web resource (Figure 6). (It also passes the object-type code 1090 which represents ‘Invoice’)

The following code snippet is from PayNowButton.html. The function GetUrlParameter() retrieves the invoice entity GUID from the URL (Figure 6)
<script>
    $(document).ready(function () {
        $("#payNow").click(payNow);
    });
    function payNow() {
        console.info("the guid value = " + GetUrlParameter('id'));
        var invoiceId = "{" + GetUrlParameter('id').toUpperCase() + "}";
    }
    function GetUrlParameter(sParam) {
        var sPageURL = window.location.search.substring(1);
        var sURLVariables = sPageURL.split('&');

        for (var i = 0; i < sURLVariables.length; i++) {
            var sParameterName = sURLVariables[i].split('=');
            if (sParameterName[0] == sParam) {
                return sParameterName[1];
            }
        }
    }
</script>4.) Pass ‘record’ by Custom Parameter(data)
Example A
Consider the following HTML web resource (Figure 7) that exists on a Dynamics 365 form. An attribute containing the data to display will be passed to the web resource via the property ‘Custom Parameter(data)’ (Figure 9). This will replace the placeholder text ‘We made this decision because…’

The implementation is as follows
In the form designer, the attribute ‘cpl_whythisdecision’ (#1 in Figure 8) is a hidden attribute. Its only purpose is to store the data that will be displayed by the web resource (#2 in Figure 8)

The text ‘cpl_whythisdecision’ is then passed to the web resource (Figure 9). The web resource recognises this attribute as the source from which it needs to retrieve the data.
(Note: if the attribute ‘cpl_whythisdecision’ had just been populated on the form, the user would need to either click elsewhere on the form or save the form for the value to available when the web resource retrieves it.)

Example B
Consider the case where help text needs to be presented on a form. The web resource could be a HTML file that lists all the possible HTML that could be placed on the form. Referring to the code below, if ‘expensesheader’ or “helptext” were placed in Custom Parameter(data), the corresponding HTML would be added to the form
<html>
<head>
    <meta http-equiv="X-UA-Compatible" content="IE=edge">
    <meta charset="utf-8">
    <title>Help</title>
    <script type="text/javascript" src="ptm_am_jquery.1.10.2.min.js"></script>
        document.onreadystatechange = function () {
            if (document.readyState == "complete") {
                getDataParam();
            }
        }
        function getDataParam() {
            if (location.search != "") {
                var paramVal = location.search.split('=')[1];
                if (paramVal == null) return;

                if (paramVal.toLowerCase() == "expensesheader") {
                    $('#pnl').append("<div class='alert alert-info' role='alert'><strong>Section:</strong> Expenses</div>");
                    return;
                }
                if (paramVal.toLowerCase() == "helptext") {
                    $('#pnl').append("<div class='alert alert-info' role='alert'><strong>The ability to upload or store attachments is temporarily unavailable.</strong></div>");
                    return;
                }
            }
        }
    </script>
    <meta>
</head>
<body style="height: 100%; overflow-wrap: break-word;" dir="LTR" lang="undefined">
    <div id="pnl"></div>
</body>
</html>
5.) window.parent.Xrm.Page
The Xrm object is deprecated in HTML web resources, however, parent.Xrm.Page is still available in the HTML web resource if it’s loaded in a form container. This means that the web resource (cpl_/Pages/PayNowButton.html) can use it to retrieve attributes from the parent (Dynamics 365) form. In the second example listed in this post, the invoiceId could have been determined by calling the client API:
parent.Xrm.Page.data.entity.getId();
In the previous example, the ‘cpl_whythisdecision’ could have been determined by calling the client API:
parent.Xrm.Page.getAttribute(‘cpl_whythisdecision’).getValue());
https://docs.microsoft.com/en-us/power-platform/important-changes-coming
References
https://learn.microsoft.com/en-us/power-apps/developer/model-driven-apps/web-resources